Make Your Own Wooden Toy Crate Project

Make Your Own Marine-style Wooden Toy Crate Step-by-step
A fun, easy to build, functional wooden toy crate
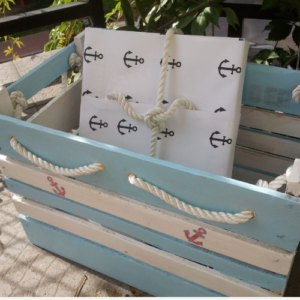
Do you love the sea? We present the original wooden toy crate for marine-style toys. You will need a wooden chest, for example, a wooden box used for fruit or vegetables. Find the right wooden slated box and paint it with wood paints. Maybe you have another way to use our wooden chest for toy treasures?
Wooden Decorative Chest
Holidays are in full swing. We will show you the steps on how to create your own wooden maritime style toy crate through using an wooden old box for fruits, vegetables, bricks, etc. Create a decorative box perfectly complementing the arrangement of the child's room. Perfect for a balcony or interior in a marine style. The decoration will allow you to enjoy the memories of holidays for a long time, and additionally will fulfill the practical functions of the clipboard, eg for newspapers, blankets, pillows, toys, etc.
Such a decorative, hand-decorated wooden box is ideal for a gift or as an addition to a gift, eg for a child. The effect not only pleases the eye and gives you satisfaction with the performance, but additionally you will gain space for storing selected wooden toy items.
Will be needed:
- wooden box
- sandpaper or grinder
- drill
- paint
- brushes (large and tiny for children's paints)
- cord approx. 3.5 m and 5-7 mm wide
- possibly a printer for printing templates
- unremitted markers
- felt furniture washers
STEP I - Cleansing the wooden chest
If the box is dirty, for example in sand or earth, first you must wash it under running water and leave it to dry. Then use abrasive paper or sander to smooth the raw wood, so that the slats and protruding edges are smooth.
STEP II - Painting wood
Secure the place of painting with newspapers or paint foundations and prepare painting tools. If you use white paint and pigment, prepare an appropriate amount of blue paint before painting.
It's best to start with one color and after painting all the selected elements change the paint. You must remember to also paint the floor of the box inside and outside - for this purpose, after the paint dries, change the position of the box. After painting the entire box and drying the paint, use a tiny brush to paint all the places that you can not paint with a large brush. Set the box to dry.
STEP III - Applying the pattern in the maritime style
Use the printer to print your chosen marine pattern, eg an anchor - preferably in various sizes. Then cut the patterns and attach them to the box. After selecting the place of decoration, put the template on and use the indelible felt-tip marker to carefully draw the pattern on the boards. Then fill it with the color - for this purpose, color the medium with the same marker pen or other in a contrasting color. You can also use paint or nail polish to paint the anchor.
STEP IV - Making decorations from a string
In selected places, drill holes through which you will thread the string. It is good to measure the place of the holes and mark them before drilling. Then pass the string through them, remembering to screw it into the holes according to the twist of the string, and not the other way round.
When planning a string decoration, you can arrange handles and / or decorative string waves. In our case, the shorter sides have been provided with handles, while the longer ones are decorated with string-like sags. From the inside of the place of passage of the string from the longer side to the shorter one are secured with knots, so that by grabbing the handles on the sides do not spoil the whole decoration.
STEP V - Securing the bottom of the toy chest
Using felt felt pads, secure the bottom of the box so that it does not scratch the floor when moving it from place to place.
All the best,
Amousewithahouse


