Wooden stove
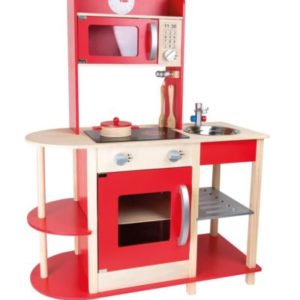
Wooden stove for children. A gift for a child - do it yourself
Original toys for children very easily made of old furniture. See how to conjure up a wooden stove from an old dresser, which can be a gift for your child. Such a wooden toy will appeal to every small chef and will also be an interesting decoration of a child's room.
Gifts made by hand are unique. A creative approach to old, unused furniture may result in an original piece of furniture that will be your favorite toy for your child. All you need is an unnecessary commode or bedside table. Ideally, if it has one drawer at the top and the door below - then work will be the least. But if it's a chest of drawers, which has only drawers - it's okay, you'll also quickly convert it to the oven door :) The most important of course are the details of a wooden toy. Therefore, do not forget about the mandatory knobs that will imitate the oven knobs, colored cork pads imitating burners, and various hooks on which the child will hang the apron and other necessary details.
Will be needed:
- wooden bedside table or commode
- three boards (about 40 x 10 cm)
- five wooden knobs
- white and black acrylic paint
- four cork washers
- piece of plexiglass (about 30 x 30 cm)
- 12 wood screws (ø 3.5 mm)
- shower system for painting
- drill
- screwdriver
- jig saw
- tools for hot gluing grinder
Step I - Creating an oven
First, unfold your cabinet into parts. If necessary, remove old varnish or paint with a grinder. If your bedside table has a tilted door at the bottom, it's enough to cut a plexiglass hole in them with a jigsaw to create an oven window. However, if it consists of several drawers, leave only the first from the top (as the place for the oven knobs), and from the next create a wooden frame of the oven. Cut them with the jigsaw, then sand their edges.
Step II - Cutting plexiglass
Using the jigsaw, cut the piece of plexiglass to the dimension of your door from the oven.
Step III - Painting
Paint the cabinet and all disassembled elements with white acrylic paint. To do this evenly, use a spray system. Remember to protect the furniture and the floor from paint, eg old newspapers, before painting. Then paint the wooden knobs in black - they will be the knobs of the toy oven. Wait until all the elements are dry before proceeding.
Step IV - Decorating
Using a hot glueing tool, glue all decorative elements to the oven: wooden knobs imitating knobs, hooks on the side wall for a glove or apron and cork pads on the top of the oven that will pretend to be burners.
Step V - Creating the oven door
Combine the frame and plexiglass with a hot glueing tool. To make the door open from the oven, fasten it to the cabinet using hinges.
Step VI - Creating the upper frame of the oven
Kitchen utensils will hang on the upper frame of the hob. Using screws and a cordless screwdriver, connect the boards and attach the finished frame to the back of the oven.
Step VII - Fixing the screws for kitchen accessories
Then screw a few screws to the strip above the burners - not quite, but so that you can hang on them the chochelki or blades.
Step VIII - Cooker ready
Cooker ready! Now all you need to do is equip it with toy pots and pans so that your child can play with the chef immediately.
All the best,
Amousewithahouse
