
Rocking horse

Instructions for creating a rocking program in the mini version. Wooden toys are always fashionable. If you design them well, keep health and safety. See how to make an eco-toy for a small child. Do it yourself for the little ones.
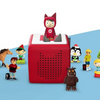
Eco rocking horse
Who among us as a child did not like rocking on a rocking horse. Exactly, I think everyone. That's why I decided to show you how to make a horse, but in the version for the little ones. Due to the low, simple and stable construction it will be more suitable for smaller children (from 1 year of age).
It will be a safe and comfortable toy made of wood that will allow the child to acquire better coordination and balance. High backrest and wooden handles will force a stable position of the child. Properly profiled skids protect against excessive tilting of the toy. Rocking horses provide great development opportunities and lots of fun with fun.
Will be needed:
- wood jigsaw drill and wood drill bit dia. 6 mm
- sandpaper with gradation 180 and 240
- wood adhesive
- 2 planks min. 20 mm, width min. 170 mm, length min. 670 mm board
- 530 × 130 mm (seat) board
- 400 × 130 mm (backrest) 2 squared timber
- 30 × 30 mm, length 450 mm 2 squared timber
- 30 × 30 mm, length 100 mm
- wood screws 12 pcs. 5 mm,
- length 60 mm wood screws 4 pcs. 5 mm, length 30 mm
- 2 strips in the shape of quarter-brackets (the length of the slats must correspond to the width of the horse's head in the base)
- wood pin length 300 mm, diam.
- 22 mm drill bit Wed. 22 mm
STEP I - Drawing skids on the board
Run skids from the board gr. min. 20 mm. One side of each skid cut in the shape of an arch. The skids visible on the drawings have to be: gr. 20 mm, length 670 mm, width at the widest point - 170 mm, in the thinnest point (sides) 10 mm.
Run the skids at the ends so that they protect the toy from too much tilting (as in the picture).
STEP II - Cutting skids
Thoroughly cut skids with a jigsaw and sand with sandpaper.
STEP III - Performing the seat
Perform the seat. For this purpose, cut a board length of 53 cm and a width of 13 cm. The length and width may be different depending on the dimensions of the toy we want to make.
STEP IV - Screwing the squares
Screw the poles to the poles. To do this, prepare two 30 × 30 mm squares. At equal intervals, drill holes at both ends (50 mm). Screw the poles to the poles with wood screws 60 mm long. To do this, drill holes in the poles at the same intervals as in squares. It is best to do this by stiffening the cantilever with the cantilever (eg by means of such a carpentry clamp) and inserting the drill into the individual holes to drill the holes in the poles). This method guarantees precise drilling of holes in the poles.
Remember that the back should be screwed on the back. That's why leave more space on the back to screw the backrest. The toy visible in the pictures was left in the front part of 90 mm, while in the rear for screwing the backrest - 130 mm.
STEP V - Screwing the seat
Once you have screwed on the poles to the poles, screw the seat in the same way by drilling holes in the boards and at the same intervals in the seat board (as in the picture). Then screw the second runner by drilling the holes on the other side of the seat the same way as when screwing the first one.
STEP VI - Screwing the backrest
Attach the back with a lenght of approx. 100 mm. Apply the wooden beams on one side to the backrest board, and to the side to the skids (as shown in the picture). The part of the backrest that will fall between the skids should be cut to a thickness of 90 mm at a distance of about 120 mm from the country of the board (2 cm on each side).
STEP VII - Making a horse's head
Cut the horse's head off the board. You can print it in the appropriate format on the printer and draw it on the board. Later, it will only be cut out of the board. Screw the head to the seat using metal angle bars screwed 30 mm long to the seat. To the angles, screw the board in the shape of a horse head with screws 30 mm long.
In addition, the head of the horse should be glued to the wood from the bottom. In place of combining the head of the horse with the seat, glue in the shape of quarter-brackets. Thanks to this, you can mask the heads of the screws. Now it is time to polish and paint the horse. For painting I recommend an ecological ecological paint or acrylic paint. It will be safer for babies. Have fun.
All the best,
Amousewithahouse


